I love posts about workshops in other countries. They show other methods of work holding, and working with tools. Often times you see amazing work being done with a few simple tools. What I really like is the simple tools.
But in every conversation about these tools, someone has to make the cheap shot about how they are doing better work than you are, with fewer tools than you have. As someone who designs and makes new tools, this is a rather unsettling thought. It also speaks to the thought that modern craftsmen have become helpless without our huge collections of tools. I don’t think that either of these ideas are entirely true.
As a carpenter in the 80’s I kept a knife, hammer, pencil, nailset, chisel, speed square, pliers, chalk box and tape measure with me at all times. These were in my pouch with an assortment of nails. In addition,we would usually have a crosscut saw, circular saw, nail gun, framing square, prybar, block plane, wrenches and screwdrivers. The difference between the set of tools for a form carpenter, framing carpenter and finish carpenter was pretty much the weight of the hammer. A framing carpenter might also have a shovel and pick around. but the tools were all pretty basic and universal.
We would make sawhorses and scaffolds when we needed them, so our workbenches were solid and simple.
As I started to try and do more with wood than make decks and sheds, I found that each process was facilitated by one or two new tools.
For example, I just made myself a new tool. While making this tool, I had to make another tool for making tools with.
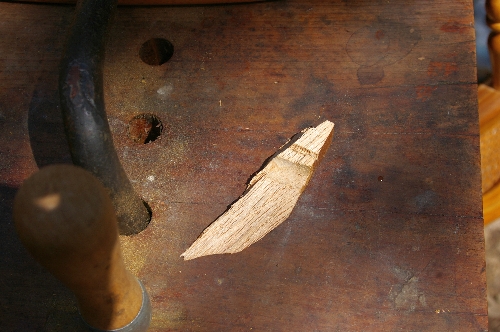
I needed to make a hexagonal hole,

Like this. To make it I made a tool by grinding a high angle edge on a hex key.

Here was my solution for a tool to make a tool. More of a scraper than anything else, with a slight relief opposite so the cut can be started.
To use it, first you drill a hole the diameter of the distance between flats on the hex key. Then you line it up and get it started. Once it gets started, it does a pretty nice job as you rotate it around carving the six sides. It only goes as deep as the bevel allows, and it wants to jam, but it does the trick, for a quick and dirty solution.
If I was making more than a few hexagonal holes, I might make one with tapers for starting holes, and cut into the side of one to make a hex float. Then I would use one with no relief, once the hole was started. But this does a good enough job with a fairly smooth side.
So in order to make a tool, I made a tool to make hexagonal holes. If I did this much, I might want several variations. Nomally this is not a tool I need, and I will probably lose this one before I need it again. So the truth is that a specialized shop will do great with a smaller set of tools. A designer, pattern maker or hobby craftsman, will be more likely to need a much broader set of tools, depending on the range of work being done. If they make hexagonal holes occasionally, they might want a few variations on this tool. Just one simple operation added could add another three tools to the collection.
Coincidentally I also have a neat new tool with a hexagonal hole in it. This presents me with another problem. I really want to show it off and show people how I made it and what it does, like I usually do. This one however is a corker. It is a tool that I would remake quickly if I lost it. For me, it is a must have tool. So I am thinking of offering it to some nice company that would be willing to part with a few thousand dollars for a pretty nice new tool design.
Maybe I should send picture of it to a company and threaten to publish it on my blog if they don’t pay me for the idea. 😉 But I am not sure that blackmail is that good a method to start a business relationship.
Bob


 A page Dedicated to My Writing
Recent Comments